Tuesday, October 8, 2013

Cooler stereo

I'd seen a bunch of stereo coolers and been doing a fair amount of floating over the summer. I decided I needed one. So I started researching to find out what I could about putting one together. It's really straightforward. You take marine (if desired) stereo equipment and put it inside a cooler. It only took me about 4-5 hours from start to finish to put it all together and get it wired up. I'm surprisingly happy with the sound.

I started with a cooler I picked up at a flea market for $5. It was a little smaller than what I wanted, which will require I be creative when I later convert it to still be used as a cooler. But it beat the hell out of buying the one I wanted for $50 new. Then I went and picked up (on sale, no less) the marine audio setup I'd decided on. The stereo is bluetooth compatible, so the stereo works as a large wireless speaker, which is awesome. After picking up a deep cycle battery that was made to run a trolling motor, I was ready to go.


 After marking out where I wanted the speakers, I used a paddle bit to make a starter hole and went to town on it with my jigsaw. I didn't take any pictures during the process of putting it together. Once I cut the holes, I mounted the speakers using the included screws. I plugged in the speaker wires and then started the most difficult task of the whole project: deciding where to put the head unit.


I eventually settled on the top of the lid, facing up. This was so I could have access to the controls without having to open the cooler. Also, it would allow the remote to access the receiver. I used some marine-grade epoxy I had left over to mount the frame for the receiver. Because of the way it hanged into the cooler, I had to stagger the battery to the opposite side. I ran the speaker lines to the appropriate length and cut them off so I didn't get too bad a rat's nest in there. I had some 16G wire laying around from a previous project so I ran it to the appropriate length for power (hot, hot switched, and ground). I soldered all the connections and used heat shrink tubing around the joints. 


I turned it on and it worked perfectly. Thing is LOUD! Now I just had to do some finishing touches. I had some small L-brackets left over from something, so I screwed them into the bottom to stabilized the battery. Then I added a 12v cigarette lighter-style plug that had a fuse built in. I have a 1 amp battery charger and an extra maintenance charger I'm going to solder a male 12v plug onto for charging through this port. I can obviously use it as a power outlet for charging phones, although the receiver has a USB plug on the front that chargers, as well as an auxiliary input. Today I used it to run a small air pump to fill a tire on my boat's trailer. But mostly I plan on using it to charge.


I plan to use this for tailgating, camping, working around the yard, etc. The original plan was to put cooler anchors on the boat and use it there (old bass boat doesn't have a stereo), but the boat will be going away soon. I'm going to build a small trailer for it so I can tow it around on my bicycle. Like I said before, it's got a bluetooth receiver in the head unit so I can take it just about anywhere and listen to to just about anything. The biggest thing I'm excited about the cooler size is that it fits perfectly in my kayak so I can take it floating or just paddling around the lake.


Stitch and glue kayak

I had been shopping for a kayak for some time. Unfortunately where I live floating the river, and kayaking in particular, had become the "in" thing to do, and to buy a used kayak was almost as expensive as a new one. I happened to stumble across something I hadn't considered. Building a kayak.

Always being one to do things myself, I was immediately hooked. I pored over countless web pages, absorbing information and deciding what I wanted. Strip built? Stitch and glue? Skin-on-frame? What could I get by with the cheapest? What would be the easiest? Fastest to get together? I finally settled on The Old Man's River Ranger 12, using some plans I found that I thought would be the easiest, fastest, cheapest to build. It comes in the 12' version (that I built), a 14' version, and a 16' version. I think I may build the 14' version next, just to get a little bit more storage and float a little higher I could find very few references to it anywhere online, and only one build thread. I had to have one, and no one knew what I was talking about. This is the picture that made me finally decide (although I don't think it's a RR):


So I got together a list of materials and waited for payday. I decided I needed to have an elevated surface to build on, so I made some saw horses and pieced together a 16' long table so I could scarf together the wood and be working with one large piece. Couldn't have worked better.


Then I set about making my scarf joint to make one long 16'x4' sheet of plywood. I used 5mm project sheets from Lowes. The scarf joint was the most time-consuming part of the whole project, although that probably has to do with the fact I did it by hand with a rasp and block sander. If I had a belt sander, I'd put some coarse-grit paper on it and be done in a jiffy. Next time. I staggered the top sheet 2" back from the bottom sheet (making the similar sides face each other so I'd have the same grain pattern the whole length), and made a mark 2" back from the edge of the top sheet. Then I planed/sanded the whole 4" wide area into one smooth angle. Then, I flipped the top sheet back over, lined up the sheets so they were overlapping on the 2" (using small nails to secure them n place) and glued them with the epoxy resin, using wax paper to keep it from sticking to the table and the 2x4 I used to apply pressure to the top.


Once that dried overnight, I started laying out the patterns for my pieces. I put my keel plate in the middle against one edge, each side piece on either side of it, and then had plenty of area on the far end to make my deck plates and bulkheads. I used small nails along the lines and a small piece of trim to make the dots from the plans line up into an even curve (the plans come with drawings of the pieces, with dots with coordinates you have to draw lines between). Once I had all my pieces laid out, I picked up a jigsaw and went to town. From my experience with a "quick cut" blade with few teeth, I suggest using a finer-toothed blade to reduce splitting as you cut. 


Once I made sure everything was going to line up, I stitched the pieces together with small zip ties. I simply used a small drill bit to make holes that lined up on each panel, then zipped them together. It was starting to look like a boat!


I made the fillets (thickened glue along the edges of mating panels to glue them together) out of the epoxy thickened with flour. Wood flour (finely ground wood) would have been ideal, but I found a couple of different places that said bread flour would be acceptable. I'll warn you since no one warned me: it will take a lot of the flour to thicken the epoxy to peanut-butter texture. I couldn't ever get it there before the epoxy started to set and gel up so I half-assed the fillets.


Then, it was time to sand. And sand. And sand. And take a break. And sand. Once I had all the panels adequately smooth (again, I half-assed it but it was good enough for me), I laid the fiberglass cloth down and smoothed it out on the outside of the hull. I wanted to pick up some good cloth, but funds, time, and impatience added up to me laying individual sheets of fiberglass cloth, again from Lowes. I covered the cloth with a first layer of resin and waited for it to dry. Again, being the cheap bastard I am, I cheaped out on the resin and got the cheap stuff. From Lowes. I also only glassed the outside of the hull, and only put one layer of resin down. On the next one I do, I'll do it like it should be done and put 3-4 layers of resin and glass the whole thing, inside and out. Do as I say, not as I do. Then I put 4 layers of varnish on the outside of the hull and turned my efforts toward the inside. 


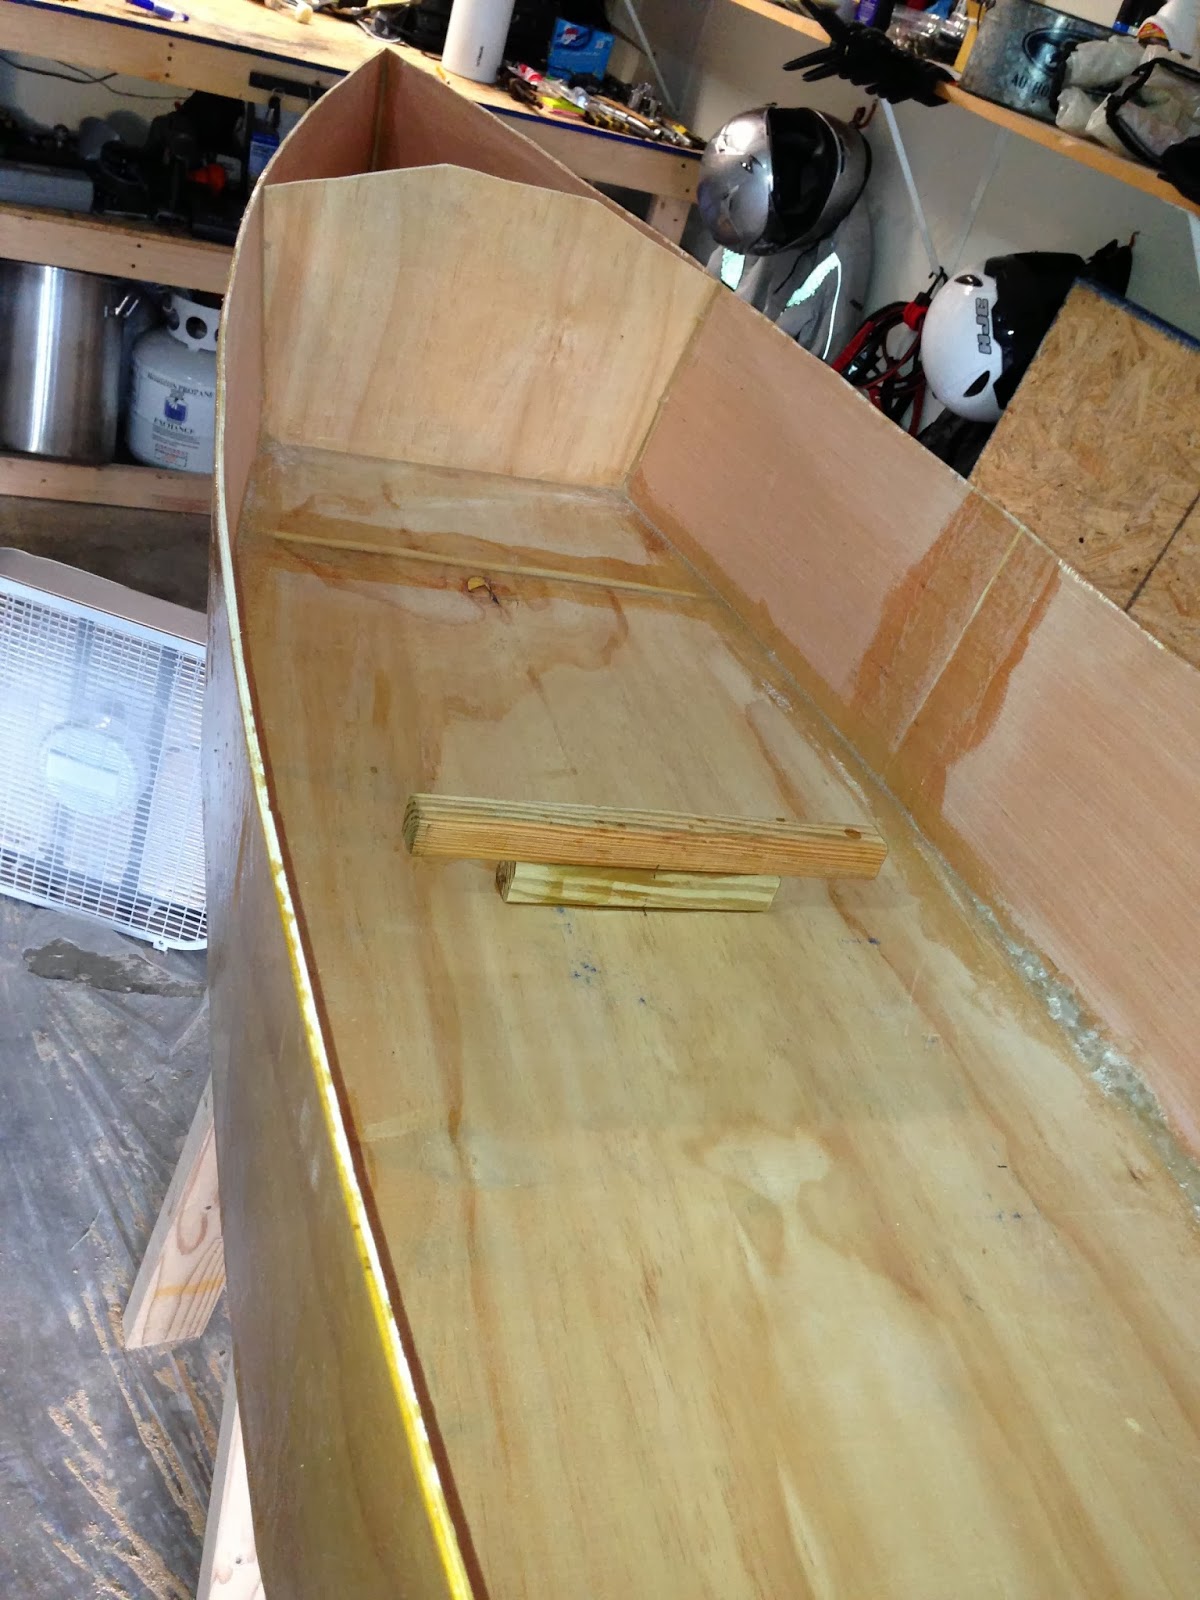
To bend the 1x3's I used as gunwales, I cut out a 2x4 and clamped the ends together. I had several ideas for a seat, but I decided to just have a couple of 2x2 sections that a canoe seat hooked onto. It didn't work at all, and would only last for one outing before I rigged up a better seat. I glued in small pieces of 2x2 in the front and back storage sections. They look kind of funny, but you'll see why they're there shortly. I used small pieces of 2x2 glued to the walls to mount the foot rests, as you'll see soon. 


I pieced together the decks by laying down wax paper, setting them together, and laying a sheet of fiberglass over them. I resined over them and waited for the resin to begin to set, and then put the decks over their places on the front and back to shape them, and clamped them down with ratchet straps, again with wax paper on top and around the edges to keep the epoxy from sticking them in place. The plans called for these to be glassed in place and holes cut in them for hatches, but I decided to make the whole panels themselves the hatches. Worked much better and was much easier in my humble opinion. Once the glass was dry I varnished over them to make 'em shiny.


I varnished the entire inside of the boat with 3 layers, and then set about putting the finishing touches on it. I cut pieces of OSB to line the inner edges of the hatches to support the decks. I used foam-rubber window weatherstripping along the top edges to create a seal. I got my deck rigging setup to bungee the hatches on and provide attachment points for various other features, like the paddle holder and front and rear storage I made inside the hatches.


Every time I go floating, someone loses a paddle. So I put the blocks in the front to hold an emergency paddle in place. The blocks in the back are spaced to hold down 2 large dry boxes. The red one is my first aid kit, and I mostly use the clear one to store my phone, wallet, and bluetooth speaker when I'm not using it. 


Once I got the bungees hooked up to hold on the decks, she was ready to get wet. Now she just needed a maiden voyage


I wanted to add cleats to the front for a bungee net (the biggest reason for the gunwales besides increased stiffness along the top edge). So as soon as I could find some I liked, I added them.


As I said earlier, the seat simply did not work, so I picked up a cheap boat seat and rigged up a way to make it sit in there and screwed it in place. It's a huge upgrade, and spending a whole day on the river is a breeze. I also added cleats behind the seat to secure a cooler for easy access to beverages. It can get hot on the river.


After pouring a filler into the nose of the boat for support, I drilled a hole and added a carry handle made of paracord. I used short lengths of paracord to make tethers for the hatches so the slid off either side and hung on the side of the boat instead of dangling or getting lost should I capsize. 


She floated wonderfully. We took it out on Labor Day, and it took us twice as long to get down the river as it should have because we kept having to stop and answer everyone's questions about it. I don't think anyone's said the words "stitch and glue" so many times in a day.


TL;DR: Imgur album

Wednesday, October 2, 2013

78 Goldwing Cafe Racer

I had been without a bike for a couple of years and was missing it really badly. My buddy Justin called and said he had just bought a bike for $800 and it was going to be awesome. Not to be outdone, I promptly got on Craigslist and started shopping. This is what I came up with.


Guy wanted $750 for a 1978 Honda Goldwing (GL1000). I went to check out the bike, and it turned out that it ran pretty well for having sat for 2 years. We settled on $700 and I came back with a trailer (it needed a new rear inner tube). I had the basis for my cafe project. Here are some more pictures after I dropped it off at Gene's Gallery, a touring motorcycle specialty store (particularly for Goldwings) that happened to be located just a few miles from home. They changed the oil, got me a new rear tube, and took care of the state inspection so I could get on the road.


That mirror there says "Big and bulbous, just like the bike!" A previous owner apparently had a sense of humor. So I set about making it closer to what I wanted. It's a big bike, almost 700 lbs, and felt like it. The first thing to go was the windshield. It was a universal-fit jobby that just clamped on the bars. The bars had to be replaced as well. I picked up a set of clubman bars with bar-end mirrors and grips from Amazon and anxiously awaited a clear day I could get them on. It took me less than an hour to get them swapped, and I was ready to ride.


Yes, I did lose some steering angle. Yes, I'm okay with that. Also, yes I kept the original cables and I'm okay with them sticking out like they do. It makes the clutch a bit heavier, but it's perfectly functional and if/when I sell it they can put it back like it was.

I rode it like that for a year, and this year put a New 2 U Kit in it, as suggested by everyone I spoke to. Basically when you buy a Goldwing, you change the timing belts. Period. Doesn't matter if the previous owner says he just did. If the timing is off, the valves will hit the pistons and your engine will be a boat anchor. The kit comes with the timing belts, spark plugs, thermostat, t-stat gasket, and new radiator hoses. When I did the New 2 U kit, I also did a valve adjustment and replaced a faulty starter solenoid that had been plaguing me for a while. 

The thing ran better than it ever had, and we ran it all over. Everywhere I took it, I got 2 responses
1. "Holy shit, that's a cool Goldwing!" and
2. "Holy shit that's a cool bike! What is it!?"


Hindsight is always 20/20 and typing this up made me realize I never should have gotten rid of it. I traded it for a boat with the thought of having something the whole family could enjoy. Guess I kinda missed the whole point of having a motorcycle to begin with....


Update July 2014: She's mine again!

I'd been casually browsing Craigslist and saw the guy had I'd sold it to had it up for sale. So, after scrounging for some extra cash I went and bought it back. I was glad to have her back, but she'd seen better days. 

He had given it a shitty paint job and dropped it "in the garage" a couple of times. He'd added crash bars and accumulated more than a full set of Vetter fairings and bags with the brackets "because the guy would only sell the whole set." Of course he didn't want it taking up space in his garage so it came home with me too. Tried to sell the , but no one appeared to want them so I just pitched them. The speedometer had ceased to work. In one of the drops, the gauges had gotten busted up so he had attached a set from a Yamaha XS. He'd tried to recover the seat only to decide the original cover was adequate, so he tried to glue it back in place but it's crooked. 


The flanges that interact with the wheel hub in the speedometer pickup had bent out of place, leading to the speedometer failure. That was easy enough to fix once I figured out what caused it. While I had the wheel off, I put the left-side front brake rotor back on and started to shop for the caliper and brake line I'd need to finish the brake setup. The crash bars came off. The clubmans went back on. And away I rode.


And then I ran into some electrical issues. When riding up to a 4-way stop, the bike just lost all its electrics and died. No lights, no starter, no nothing. It was a Saturday night downtown, so I pushed the bike off to the side as traffic tried to move around me and went to work trying to find the gremlin. I thought maybe it had blown a main fuse, but the previous owner had removed the main fuse, replacing it with a straight piece of wire. After some pushing it out of traffic and doing some more digging (and sending a nasty email to him to try to figure out why the hell he'd remove the main fuse) I discovered that the plug to the ignition switch had come loose. Pushing it back on gave me power back, and I zip-tied it and rode home to find a solution. I ended up removing the plug entirely, and with the help of my trusty wiring diagram I wired in a toggle switch inside the false tank box. Until I got the wiring fixed, we took to calling her "Old Blue Balls." You really want to ride her, but she doesn't always let you.

I was sure an oil change was due, so I gathered the appropriate supplies and a spin-on filter adapter. I flushed the radiator and changed the rear differential oil (it looked like probably hadn't been changed in the bike's 35k miles. I bought a cab sync tool and sync'd the carburetors, adjusted the valves, and adjusted the ignition timing. Runs better than it ever has for me.

The gauges were next to go. I took off the XS gauges and made a bracket to hold just the original speedometer with a couple of LED idiot lights for Neutral and oil pressure. Put LED bulbs in all the gauges.


Update: Winter 2014/15 - Paint

Decided the shitty blue paint job had to go. I bought off ebay the right-side body panel that had been missing. It was cracked so repaired it and used body filler to smooth out the crack on the front. I wanted to go with a creamy white with red and blue stripes, but decided for the time being to go black. After many, many hours of body filler, priming, and sanding I ended up with a decent rattle-can job. It's not as glossy as I'd like, but after I decide whether or not to do a pattern on the side panels I'll shoot a clear coat over it. I picked up some new badges for the sides of the false tank that I'll put on when it's all said and done, probably sometime this spring. 


Next is to get the seat recovered in brown leather with matching brown leather grips. I'm planning to use perforated bicycle grip tape. Once I get that done I can figure out how I'm going to attach an LED strip light to the tail and ditch the rear fender/light setup.  I want to find a GSXR for setup and do a fork swap to beef up the front end a bit, but that'll be down the road. Once I get the seat and grips sorted out, I'll likely spring for the Dyna S electronic ignition and Randakk's carb rebuilt kit. We will see what the future brings.